커스텀 캘린더 뷰를 만들어야할 일이 있어서 만들었는데 글로도 한번 써보자..

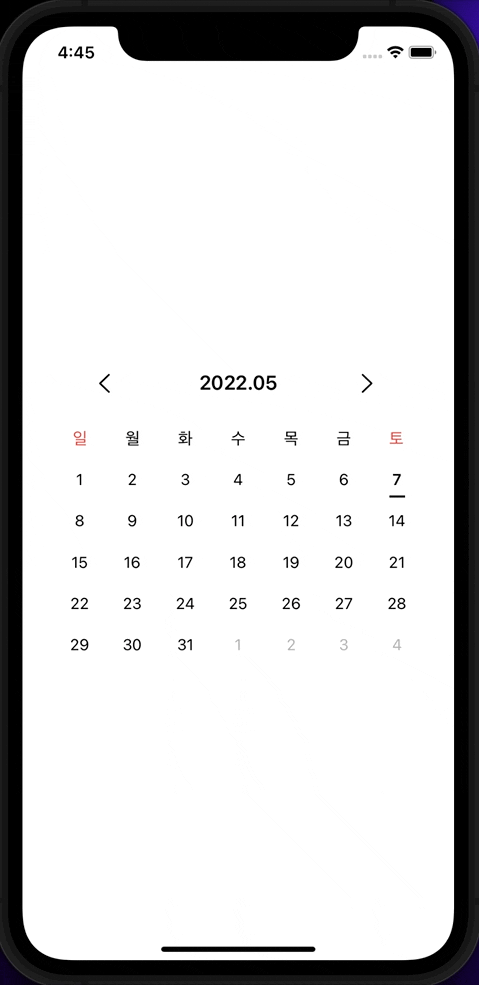

오토레이아웃과 Xib 관련된 설명은 생략.. 너무 길어질거 같으니.. 잘 만들어 2개의 Custom View를 만들어 주고 @IBOutlet로 코드랑 연결 시킴. 그럼 일단 반은 했다. 저기서 중요한 점은 CollectionView의 Height를 조금이라도 지정해야 한다. 이걸 지정안하고 처음에 CollectionView Height가 0으로 지정되어 버리면 DataSource에 데이터를 채워도 Cell 자체가 호출이 안됨. 보여줄 Cell이 없기 때문. 그리고 DataSource가 CollectionView를 업데이트 하는 시기에 layoutSubViews가 호출되는데 여기에서 CollectionView의 Height를 Constant Size의 Height로 바꿔 주면 날짜 전체가 스크롤 없이 보이게 된다.
import RxDataSources

struct CustomCalendarCellDataSource {
  var items: [CustomCalendarCellModel]
  var identity: String
}

struct CustomCalendarCellModel: IdentifiableType, Equatable {
  typealias Identity = String

  var identity: Identity

  let isCurrentMonth: Bool
  let isSelected: Bool
  let isCurrentDay: Bool
  let day: Int
  let date: Date?
}

extension CustomCalendarCellDataSource: AnimatableSectionModelType {
  init(original: CustomCalendarCellDataSource, items: [CustomCalendarCellModel]) {
    self = original
    self.items = items
  }
}
Model 정의. RxDataSources를 사용하려면 CellModel은 IdentifiableType, Equatable 을 채택해야 하고, SectionModel는
AnimatableSectionModelType를 채택해야 한다. isCurrentMonth는 cell의 날짜가 현재 달의 날짜인지, isSelected는 현재 날짜가 선택됐는지, isCurrentDay는 날짜가 오늘인지, day는 cell의 일을 저장하고, data는 현재 셀의 년, 월, 일 전체 날짜를 저장한다.
import Foundation

public protocol IdentifiableType {
    associatedtype Identity: Hashable

    var identity : Identity { get }
}
IdentifiableType 프로토콜은 이렇게 생겼는데, identity 프로퍼티는 Hashable만을 받는다 이것을 채택함으로써 Model을 찾을 때 HashTable에서 O(1)로 Model을 찾을 수 있다. 여기서 RxDataSource와 DiffableDataSource가 매우 유사하다고 느낌. CellModel이 유일해야하므로 다른 모델과 비교가능하도록 Equatable까지 채택한다.
import Foundation

public protocol AnimatableSectionModelType
    : SectionModelType
    , IdentifiableType where Item: IdentifiableType, Item: Equatable {
}

public protocol SectionModelType {
    associatedtype Item

    var items: [Item] { get }

    init(original: Self, items: [Item])
}
SectionModel 또한, IdentifiableType을 채택하고 있고 SectionModelType이라는 프로토콜을 형태를 강제한다. Section에는 item이 있어야하니까.. 그러므로 item 또한 위의 CellModel이 따르고 있는 IdentifiableType, Equatable을 다른 타입이 들어오지 못하도록 where 키워드를 통해 강제하고 있다.
저 형태를 모두 맞춰 주었으면 CellDataSource를 다 만들은 것.
struct CustomCalendarViewModelInput {
    let selectedItem: BehaviorSubject<CustomCalendarCellModel?>
    let beforeMonth: BehaviorSubject<Void?>
    let nextMonth: BehaviorSubject<Void?>
}

struct CustomCalendarViewModelOutput {
    let yearMonthText: Driver<String>
    let selectedDate: Driver<Date?>
    let cellDataSource: Driver<[CustomCalendarCellDataSource]>
}
ViewModel의 Input Output으로 3개씩 프로퍼티를 만들어준다. Input의 selectedItem은 현재 선택 event를 받기 위함이고, beforeMonth, nextMonth는 전의 달, 다음 달로 넘어갈 수 있도록 프로퍼티를 만들어줌. Output으로는 보여줄 년 월이 무엇인지 알려줄 yearMonthText, 현재 선택된 date를 저장할 selectedDate와 CollectionView DataSource에 Binding될 CellDataSource.
private let _dateFormatter = DateFormatter()
private let _dayFormatter = DateFormatter()

private let _currentDate = Date()
private var _calendar = Calendar.init(identifier: .gregorian)
private var _components = DateComponents()
private var _beforeComponents = DateComponents()
보여줄 년월을 알맞은 String으로 바꿔줄 _dateFormattor와 년월일 날짜 비교를 위해 만든 _dayFormattor. 오늘 날짜를 저장할 _currentDate. components를 date형식으로 바꿔줄 _calendar, 현재 보여줄 달을 위한 _components. 전의 달이 며칠까지 있는지 계산할 수 있도록 _beforeComponents를 하나더 만들어 줬음.
    private func _configure() {
    	self._dateFormatter.dateFormat = "yyyy.MM"
        self._dayFormatter.dateFormat = "yyyyMMdd"

        self._configureCalendar(self._currentDate)
    }

    private func _configureCalendar(_ date: Date) {
        let currentYear = _calendar.component(.year, from: date)
        let currentMonth = _calendar.component(.month, from: date)

        self._components.year = currentYear
        self._components.month = currentMonth
        self._components.day = 1

        self._beforeComponents.year = currentYear
        self._beforeComponents.month = currentMonth - 1
        self._beforeComponents.day = 1

        self._makeCalendarCellDataSource()
    }
dateFomattor를 지정해주고, calendar와 components들을 현재 날짜를 기준으로 초기화 해준다.
    private func _makeCalendarCellDataSource() {
        guard let firstDayOfMonth = _calendar.date(from: _components),
              let beforeDayOfMonth = _calendar.date(from: _beforeComponents),
              let daysCountInMonth = _calendar.range(of: .day, in: .month, for: firstDayOfMonth)?.count,
              let daysCountBeforeMonth = _calendar.range(of: .day, in: .month, for: beforeDayOfMonth)?.count
        else { return }

        let firstWeekday = 2 - _calendar.component(.weekday, from: firstDayOfMonth)

        let currentMonth = self._components.month ?? 12
        let yearMonth = _dateFormatter.string(from: firstDayOfMonth)
        self._yearMonthText.onNext(yearMonth)

        var cellModels = [CustomCalendarCellModel]()

        for day in firstWeekday...daysCountInMonth {
            var tempComponents = _components
            tempComponents.day = day
            if day < 1 {
                cellModels.append(CustomCalendarCellModel(
                    identity: UUID().uuidString,
                    isCurrentMonth: false,
                    isSelected: isSelectedDate(_calendar.date(from: tempComponents)),
                    isCurrentDay: false,
                    day: daysCountBeforeMonth + day,
                    date: _calendar.date(from: tempComponents))
                )
            } else {
                cellModels.append(CustomCalendarCellModel(
                    identity: UUID().uuidString,
                    isCurrentMonth: true,
                    isSelected: isSelectedDate(_calendar.date(from: tempComponents)),
                    isCurrentDay: isSameDate(_calendar.date(from: tempComponents)),
                    day: day,
                    date: _calendar.date(from: tempComponents))
                )
            }
        }

        var nextDay = 1

        while cellModels.count % 7 != 0 {
            var tempComponents = _components
            tempComponents.month = currentMonth + 1
            tempComponents.day = nextDay

            cellModels.append(CustomCalendarCellModel(
                identity: UUID().uuidString,
                isCurrentMonth: false,
                isSelected: isSelectedDate(_calendar.date(from: tempComponents)),
                isCurrentDay: false,
                day: nextDay,
                date: _calendar.date(from: tempComponents))
            )
            nextDay += 1
        }

        self._cellDataSource.onNext([
            CustomCalendarCellDataSource(items: cellModels, identity: UUID().uuidString)
        ])
    }

    private func isSelectedDate(_ date: Date?) -> Bool {
        guard let compareDate = try? self._selectedDate.value(),
              let date = date else { return false }

        let firstDate = _dayFormatter.string(from: compareDate)
        let secondDate = _dayFormatter.string(from: date)

        return firstDate == secondDate
    }

    private func isSameDate(_ date: Date?) -> Bool {
        guard let date = date else { return false }

        let firstDate = _dayFormatter.string(from: self._currentDate)
        let secondDate = _dayFormatter.string(from: date)

        return firstDate == secondDate
    }
한국의 달력은 일요일부터 시작하므로 2를 .weekday로 구한 날짜에 뺀다. 그리고 보여줄 달의 마지막 날을 구해 반복문을 돌리는데, .weekday로 구한 날은 1부터 일요일로 시작하므로 음수라면 저번달이다. 따라서 아까 구한 전 달의 마지막 날짜를 기반으로 day를 표기하고, 양수라면 현재달이므로 그대로 day를 넣어준다. 그런 다음 현재 cellDatasource에 저장된 날이 7의 배수가 아니라면 cell이 덜 채워 진거니 다음달 또한 7의 배수가 될때까지 넣어준다. 그리고 만들어진 데이터를 _cellDataSource의 이벤트로 보내준다.
    private func _bindSelectedItem() {
        self._selectedItem
            .compactMap { $0 }
            .subscribe(onNext : { [weak self] model in
                guard let self = self,
                      let cellDataSource = try? self._cellDataSource.value(),
                      let cellModels = cellDataSource.first else { return }

                var isCurrentMonth = true

                let dataSource = cellModels.items.map { cell -> CustomCalendarCellModel in
                    if model.identity == cell.identity {
                        if !model.isCurrentMonth { isCurrentMonth = false }
                        else { self._selectedDate.onNext(model.date ?? Date()) }
                        return CustomCalendarCellModel(
                            identity: cell.identity,
                            isCurrentMonth: cell.isCurrentMonth,
                            isSelected: true,
                            isCurrentDay: cell.isCurrentDay,
                            day: cell.day,
                            date: cell.date
                        )
                    }
                    return CustomCalendarCellModel(
                        identity: cell.identity,
                        isCurrentMonth: cell.isCurrentMonth,
                        isSelected: false,
                        isCurrentDay: cell.isCurrentDay,
                        day: cell.day,
                        date: cell.date
                    )
                }

                if isCurrentMonth {
                    self._cellDataSource.onNext([
                        CustomCalendarCellDataSource(items: dataSource, identity: cellModels.identity)
                    ])
                }
            })
            .disposed(by: disposeBag)
    }

    private func _bindBeforeMonth() {
        self._beforeMonth
            .compactMap { $0 }
            .subscribe(onNext: { [weak self] _ in
                guard let self = self,
                      let month = self._components.month else { return }

                self._beforeComponents.month = month - 2
                self._components.month = month - 1
                self._makeCalendarCellDataSource()
            })
            .disposed(by: disposeBag)
    }

    private func _bindNextMonth() {
        self._nextMonth
            .compactMap { $0 }
            .subscribe(onNext: { [weak self] _ in
                guard let self = self,
                      let month = self._components.month else { return }

                self._beforeComponents.month = month
                self._components.month = month + 1
                self._makeCalendarCellDataSource()

            })
            .disposed(by: disposeBag)
    }
선택된 Cell의 색을 바꾸고 현재 선택된 데이터를 저장하는 Binding과 전달, 다음달을 보여줄 수 있도록 Binding한 로직.
import UIKit

import RxSwift
import RxCocoa
import RxDataSources

protocol CustomCalenderViewDelegate: AnyObject {
    func didSelectedDate(date: Date)
}

@IBDesignable
final class CustomCalendarView: UIView {
    private let xibName = "CustomCalendar"

    @IBOutlet weak var yearMonthLabel: UILabel!
    @IBOutlet weak var calendarCollectionView: UICollectionView!
    @IBOutlet weak var calendarHeightConstraints: NSLayoutConstraint!

    weak var delegate: CustomCalenderViewDelegate?

    var disposeBag: DisposeBag = DisposeBag()

    var viewModel = CustomCalendarViewModel()

    override init(frame: CGRect) {
        super.init(frame: frame)
        self.configure()
    }

    required init?(coder aDecoder: NSCoder) {
        super.init(coder: aDecoder)
        self.configure()
    }

    private func configure(){
        guard let view = Bundle
            .main
            .loadNibNamed(xibName, owner: self, options: nil)?
            .first as? UIView else { return }
        view.frame = self.bounds
        self.addSubview(view)

        self._configureBase()

        self._bindCalendarCollectionView()
        self._bindYearMonthText()
        self._bindSelectedDate()
    }

    override func layoutSubviews() {
        super.layoutSubviews()

        calendarHeightConstraints.constant = self.calendarCollectionView.contentSize.height
    }

    private func _configureBase() {
        self.calendarCollectionView.delegate = self
        CustomCalendarCell.register(to: self.calendarCollectionView)
    }

    @IBAction func beforeMonthAction(_ sender: Any) {
        self.viewModel.input.beforeMonth.onNext(())
    }

    @IBAction func nextMonthAction(_ sender: Any) {
        self.viewModel.input.nextMonth.onNext(())
    }

    private func _bindCalendarCollectionView() {
        let dataSource = RxCollectionViewSectionedAnimatedDataSource<CustomCalendarCellDataSource>(
            configureCell: { dataSource, collectionView, indexPath, item in
                guard let cell = collectionView.dequeueReusableCell(
                    withReuseIdentifier: CustomCalendarCell.identifier,
                    for: indexPath
                ) as? CustomCalendarCell else { return UICollectionViewCell() }

                cell.display(cellModel: item)

                return cell
            }
        )

        dataSource.animationConfiguration = AnimationConfiguration(
            insertAnimation: .fade,
            reloadAnimation: .fade,
            deleteAnimation: .fade
        )

        self.viewModel.output.cellDataSource
            .drive(calendarCollectionView.rx.items(dataSource: dataSource))
            .disposed(by: disposeBag)

        self.calendarCollectionView.rx.modelSelected(CustomCalendarCellModel.self)
            .subscribe(onNext: { [weak self] cellModel in
                self?.viewModel.input.selectedItem.onNext(cellModel)
            })
            .disposed(by: disposeBag)
    }

    private func _bindYearMonthText() {
        self.viewModel.output.yearMonthText
            .drive(self.yearMonthLabel.rx.text)
            .disposed(by: disposeBag)
    }

    private func _bindSelectedDate() {
        self.viewModel.output.selectedDate
            .compactMap { $0 }
            .drive(onNext: { [weak self] date in
                self?.delegate?.didSelectedDate(date: date)
            })
            .disposed(by: disposeBag)
    }
}

extension CustomCalendarView: UICollectionViewDelegateFlowLayout {
  func collectionView(_ collectionView: UICollectionView, layout collectionViewLayout: UICollectionViewLayout, sizeForItemAt indexPath: IndexPath) -> CGSize {
    let minColumnWidth: CGFloat = self.bounds.width / 7
      return CGSize(width: minColumnWidth - 1, height: (minColumnWidth - 1) * (4 / 5) - 2)
  }

  func collectionView(_ collectionView: UICollectionView, layout collectionViewLayout: UICollectionViewLayout, minimumLineSpacingForSectionAt section: Int) -> CGFloat {
      return 2
  }

  func collectionView(_ collectionView: UICollectionView, layout collectionViewLayout: UICollectionViewLayout, minimumInteritemSpacingForSectionAt section: Int) -> CGFloat {
      return 1
  }
}
그리고 View에서 Output 프로퍼티들을 Binding하고, CollectionView의 DataSource를 선언해준다. 또한, Input을 아까 의도한 로직에 이벤트를 넣는다, 그리고 Cell을 Model에 맞춰서 업데이트 해주면 캘린더가 완성된다.
import UIKit

class CustomCalendarCell: UICollectionViewCell {
    @IBOutlet weak var dayLabel: UILabel!
    @IBOutlet weak var dayFooterView: UIView!

    static let identifier = "CustomCalendarCell"

    static private let _nibName: UINib = UINib(nibName: CustomCalendarCell.identifier, bundle: .main)

    static func register(to collectionView: UICollectionView) {
        collectionView.register(
            _nibName,
            forCellWithReuseIdentifier: CustomCalendarCell.identifier
        )
    }

    required init?(coder: NSCoder) {
        super.init(coder: coder)
        self._configureView()
    }

    override func awakeFromNib() {
        super.awakeFromNib()
        self._configureView()
    }

    override func prepareForReuse() {
        self.dayLabel.font = .systemFont(ofSize: 15, weight: .regular)
        self.dayLabel.alpha = 1.0
        self.dayFooterView.isHidden = true
        self.backgroundColor = .clear
        self.dayLabel.textColor = .label
        self.dayFooterView.backgroundColor = .label
    }

    private func _configureView() {
        self.layer.cornerRadius = 10
        self.layer.masksToBounds = false
        self.clipsToBounds = true
    }

    func display(cellModel: CustomCalendarCellModel) {
        self.dayLabel.text = "\(cellModel.day)"

        if !cellModel.isCurrentMonth {
            self.dayLabel.alpha = 0.3
        } else {
            self.dayLabel.alpha = 1.0
        }

        if cellModel.isCurrentDay {
            self.dayFooterView.isHidden = false
            self.dayLabel.font = .systemFont(ofSize: 15, weight: .semibold)
        }

        if cellModel.isSelected {
            self.backgroundColor = .systemBlue
            self.dayLabel.alpha = 1.0
            self.dayLabel.textColor = .white
        }
    }
}
전체 코드
https://github.com/MINRYUL/CustomCalendarView
GitHub - MINRYUL/CustomCalendarView
Contribute to MINRYUL/CustomCalendarView development by creating an account on GitHub.
github.com
'iOS > 학습' 카테고리의 다른 글
| RxNimble + Quick Unit Test (0) | 2022.05.26 |
|---|---|
| iOS View 에서의 init 함수들 (0) | 2022.05.08 |
| iOS에서의 Frame vs Bounds (0) | 2022.04.24 |
| Storyboard 에서 Generic Type 의존성 주입하기 (0) | 2022.03.20 |
| translatesAutoresizingMaskIntoConstraints (0) | 2022.02.13 |